How many times have you gone into a thrift store and giggled at an over-the-top, overly puffy, brightly-coloured or multi-patterned dress from the 80s, that sure, is completely FANTASTIC, but at the same time, just far too hilarious /impractical to ever be worn out in public? Well if you don't feel guilty about cutting these dresses up, they can actually be the perfect project, and you can turn them into something much more on-trend.
Take this puffy-sleeved, bright blue velvet number here, for instance:  I actually ended up chopping it in half, and making it into both a tight-fitting blue velvet skirt, and a cropped peter-pan collar embellished singlet top. I'm just wearing both here at the same time! (And they work together as well, as a dress!) 
So next time you're laughing at that ridiculous dress in a charity store, stop and think for a moment: actually, maybe that could become awesome with a little DIY!
Hope you're all super well & happy!
xxx Annika
|

Tuesday 28 February 2012
A little bit of Do-It-Yourself Inspiration: turning weird things from thrift stores into nice things you can wear!
Sunday 26 February 2012
So I got the urge to paint birds on my wall today...
.jpg) .jpg) 
Today I got this random urge to paint the wall in my study. It was pretty easy because I just recycled these stencils:

which I also used to paint my DIY swallow/Miu Miu inspired tights.
My mum liked them so much that she said she'll commission me to paint some in her house! (I was worried at first she'd have a typical parental attack and be annoyed that I'd painted stuff all over my walls. But then I remembered that luckily, my mum is awesome.)
They give the room such a lovely free, airy feeling, and they look quite pretty as well, which doesn't hurt.
I wonder what else I can do with these stencils? I think I'm going to paint some across my kitchen table...
BIRDS ON EVERYTHING!
I'm actually not joking.

Have a beautiful day!
xxx Annika
|
Friday 24 February 2012
Do-it-yourself Hand Painted Deer Print T-Shirt
 I've been so in love with sweaters, t-shirts and cardigans lately which feature these kind of kitschy animal prints:   
These are the inspiration behind this deer-print t-shirt DIY. Enjoy!

You will need
- Fabric paint
- A fine paint brush
- A plain t-shirt
- A square of cardboard (can be from anywhere, an old cereal box, etc)
- Scissors
- A pen
- An iron
   1. Wash your t-shirt first (this helps the fabric paint stay on later).
2. Iron it
3. Now you need to make your stencils! Use an image from online and print it onto a piece of paper, then trace it onto your cardboard, OR hand draw onto your piece of cardboard. The design should measure around 4 by 2.5 inches, but you can vary this depending on what you want. When you've drawn your design, cut your stencil out with scissors, and join it back up with stickytape.
4. Place the stencil onto your shirt, making sure it's parallel to the top and bottom of the shirt so that it's straight. Fill the stencil in thickly with your fabric paint. Once it's filled in, remove the stencil carefully and fix up any edges with your paintbrush. If you found antlers too fiddly to put in the stencil, but want little reindeers like me, you can also hand paint your antlers on at this point!
5. Paint your deers onto your shirt using the above images as a reference, or however you would like them to be arranged. When you flip the stencil over to do the ones facing backwards, make sure to clean your stencil with some tissue paper first!
6. When you're done, let it dry for a few hours. Then, run over each deer with a hot iron for 1-2 minutes. This should make it washing-machine safe (as long as you started with a decent fabric paint).
You're done! Enjoy your lovely updated deer-print shirt!
Here's some photos of it in an outfit:        Wearing: Shirt - DIY Bag - Vintage Skirt - Momo, Wonder Rocket (Tokyo) Socks - Tutuanna (Tokyo) Boots - Vintage Diana Ferrari Hat - Markets in Osaka Hope you're having a sweet day! xxx Annika |
Wednesday 22 February 2012
DIY Knee Patches & Vintage Dresses
 
I bought this vintage dress for $5 from a small vintage boutique in Newtown, Sydney the other day. Isn't it incredible? It's basically perfect. Well, it was after I shortened it (it was considerably longer when I bought it, reaching the most awkward dress length at mid-calf. It's either got to be floor-length or very short, when I'm choosing a dress!) and washed (well, scrubbed, a lot) a suspicious stain off the collar. Ahh well, it's not proper thrifting until you can bring back stories about suspicious stains and the like! And there's also a button missing that I have to find a replacement for. Still: $5!!

Ahh.. and I forgot to iron it. That's a little embarrassing.

And these below are some cream knee-high socks that I added knee-patches to. I think they're pretty cute! I hand-stitched these because I thought it suited the fabric.
  
And my rings! (I took photos of everything today, so you can see all the pretty details.)

Wearing:
Dress - Vintage
Bag - Vintage
Necklace - here
Elk Ring - here
Cat Ring - Vintage
Shoes - here
Socks - Tutuanna (Japan) and DIY'd
Hat - From Markets in Osaka
This outfit is just one in 4 in which I'm remixing this vintage dress (wearing it 4 different ways). I'm doing a wardrobe remix for the lovely Polly at The Littlest Polly, and am so excited about it! More about that to come!
It's embarrassing, and shows just what a new blogger I am, that I didn't even know what a wardrobe remix was until Polly explained it to me! But now I've done one... I'm addicted! So keep an eye out for this wardrobe remix in the next few days, and very quite possibly as a regular feature on the Pineneedle Collective!
I hope you have all had/are having a beautiful day, wherever you are!
xxx Annika
|
.jpg)
Tuesday 21 February 2012
Handmade Skirt
Yesterday I promised photos of my handmade skirt in an outfit, and here they are.


So I also made these tights today but not sure what I think of them yet, if they're weird or nice... I think perhaps the same design but lower on the leg would be a lot nicer. Ah well! No harm in trying something out ;)

Yep, okay, I like them, but the placement sucks. I'll be trying these out again tomorrow, but waaaay lower on the leg instead! And I'll fix these ones by painting the hearts all the way down the leg.
There's always more projects to be done!
xxx Annika
Monday 20 February 2012
Make Yourself a Floral Pencil Skirt
CAUTION: Take this tutorial with a grain of salt. I made it when I was jusssst learning how to sew and was basically just making stuff up as I went along. It'll probably still work, but there's also probably *much* better ways to do this. You have been warned!

I came across this gorgeous thing the other day:

and immediately thought - Buy. Buy now. I must buy this, now.
Unfortunately, the link on Fashiolista led me nowhere, and in this brief kerfuffle another thought was allowed to sneak its way into my mind, which was - no. Don't buy. You can't keep spending money on clothes, you already have too many clothes, and you don't have any money. DON'T BUY IT!!
So I decided to sew myself a very similar skirt, instead.

(Sorry I don't have any more photos than this today. I have been waiting all day for the sun to come out, but it's been raining and raining, and I haven't had any good light. I'll post some more pictures of me wearing it as soon as it's not raining!)
I'm sharing this DIY with you all because it actually ended up being super super easy and quick to do! Unfortunately, I didn't take any pictures of the process, so you'll have to put up with my very professional paint diagrams instead.
Enjoy!
What you'll need:
- Some pretty floral STRETCHY fabric. Use anything with a floral, kitschy, "my grandma's old couch" pattern, as long as it provides enough fabric to wrap around your waist and hips (plus a bit extra) and not be too short, either.
- Thread and needle, or a sewing machine
- Scissors
- Sewing pins (optional)
- An iron (optional)
- An iron (optional)
- A tape measure
- A pen and ruler
- A short zipper
Firstly, you need to make three measurements. They will take the names x, y, and z in the diagrams.
x is your waist measurement
y is your hip measurement (measure around the fullest part of your bottom. if you don't measure around the fullest part, your skirt won't fit!)
z is the measurement from where you took your waist measurement, down to the fullest part of your hips.
ie:
ie:

Next, cut your fabric into two identical rectangles, each measuring (your hip length plus 2 inches) x (desired skirt length plus 2 inches), ie:

Then hem up one inch on both ends of both pieces of fabric, and press with an iron.

Next, sandwich these two pieces of fabric together, the right-side up facing inwards (so you can only see the wrong side of the fabric). Pin the pieces together with sewing pins, so they are exactly aligned.
Choose which side you'll draw on (it doesn't matter which side). Then, draw your measurements out onto the fabric. Along the top edge, draw your waist measurement (x) exactly in the middle (you can get it exactly in the middle by halving the fabric and marking this with a small line, unfolding it, then halving your waist measurement and drawing each half-measurement out from that centre mark).
From x, draw a line down on both sides the length of z.
Then at the bottom of z, draw a line horizontally across at y, your hip measurement.
It should look something like this


Sew from on both sides, from the edges of x to edges of y (see diagram below). Make sure you leave at least 1 inch on each side after you sew down from y.
From the diagram, you need to sew on the dotted line (you can draw this out with pen onto the fabric as well, if you'd like).
From the diagram, you need to sew on the dotted line (you can draw this out with pen onto the fabric as well, if you'd like).

Turn the skirt inside-out (it should now be the RIGHT way around). Don't try it on yet! It won't fit just yet, you need to put the zip in! (I say this only because I tried to put it on here. And then felt really silly. Oh dear.)
Make a slit the length of your zipper in the middle of the back of the skirt.


Sew in your zipper! If you don't know how to do this, this site and this site explain how to sew in a zipper much better than I could (with only my paint diagrams, anyway).

Voilà! That wasn't too hard, was it? I think I may have made it look more complicated than it really is. It's really super easy though, I promise! Give it your best go ;)
Have a fabulous day!
Annika xxx
Why buy when you can DIY?
Here's four things that I made recently, after seeing similar things for sale online. I saved at least $100 by making them myself!

The Inspiration:

Skirt - Not sure where this one is from, I couldn't find a link to the original source

H&M Deer-print sweater
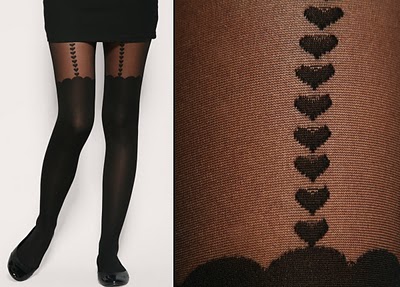
ASOS sheer patterned tights

New Look floral brogues
Okay.. so they don't exactly work together as an outfit, as such. I just wanted to get them all into one photo!
The DIY for the tights can be found here, the shoes here, and I will be posting separate DIYs for the skirt and t-shirt in the next few days! This is just a sneak preview ;)
Have a most excellent day,
Annika
Subscribe to:
Posts (Atom)